Some of our best adventures happen in the outdoors. The outdoors gives you a sense of exploration and wonder, which lead to some great stories and even better photos. This is where the Explorer collection comes in. This outdoor collection is perfect for capturing and commemorating all your best adventures. The best way to accentuate and spice up these layouts? With some awesome outdoor scrapbook borders, of course! Check out these outdoor scrapbook border ideas in today’s post!
Krislyn’s Inspiration:
The Explorer collection has me dreaming of adventures to go on, from a casual paddle along the shore to a vacation in the Rockies! The Camouflage papers blend beautifully and add to the natural feel. Creating these outdoors borders was so much fun, I couldn’t stop, so I made six! I tried to include many of the most popular outdoor-enthusiast activities, so hopefully a few will apply to pictures you are making pages for.

To create these borders you’ll need:
- Explorer Paper Pack
- Explorer Stickers
- Camouflage Paper Pack
- Crimson Carstock
- Royal Blue Cardstock
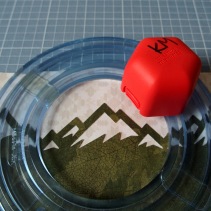
- Majestic Mountains Border Punch
- Scallop Border Punch
- On the Vine Border Punch
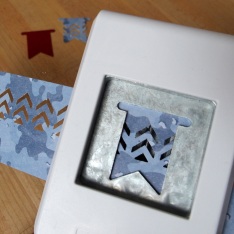
- Banner Flag Punch
- Essentials 4-Way Punch
- Original Border Maker System with Picket Fence, Double Chevron and Rainbow Border Maker Cartridges
- 12-inch Trimmer
- Custom Cutting System with Circle Patterns
- Tape Runner
- Repositionable Tape Runner Refill
- Foam Squares
Flannel Fever Border

Step 1: Punch a border with the Majestic Mountains Border Punch with blue-and-white Camouflage patterned paper. Trim to measure 3-3/4″ x 12″. Punch another border with the Majestic Mountains Border Punch with Royal Blue Cardstock. Trim to measure 3-3/8″ x 12″ and mount on top of the first border, aligning at the bottom edge.
Step 2: Cut a 2-1/4″ x 12″ strip of birch Camouflage paper. Mount just underneath the mountains. Trim out the blue plaid and boot print border strips from the borders sheet of Explorer paper. Adhere 1/2″ below the birch strip, aligning the blue plaid strip at the bottom edge.
Step 3: Add the “Flannel Fever”, stars, axe and cup stickers, popping some up with Foam Squares as desired.
Hunting Border

Step 1: Using the Picket Fence Border Maker Cartridge, punch a border with brown Camouflage patterned paper. Trim to measure 3-1/4″ x 12″ and punch the other side to create your base. Punch a border with green plaid Explorer patterned paper. Trim to measure 2-3/4″ x 12″ and punch the other side. Mount this piece on the base.
Step 2: Cut the trees border strip from the borders sheet of Explorer patterned paper. Adhere to the border, just underneath the top green plaid edge as shown. Cut a 1″ x 12″ strip of green-and-brown Camouflage patterned paper and adhere it to the border, just above the bottom green plaid edge. Add the rope border sticker.
Step 3: Top with the antlers, arrow and deer crossing sign stickers, popping some up with Foam Squares as desired.
Wild and Free Border

Step 1: Punch a border with the Scallop Border Punch with blue Camouflage patterned paper. Trim it to measure 3-3/4″ x 12″ and punch the other side to create your base.
Step 2: Cut a 2-1/2″ x 12″ strip of red Explorer patterned paper and adhere it to the base in the middle. Trim out the fish and lures and Lake Life section of the borders sheet of Explorer paper. Adhere it to the border.
Step 3: Top with the “Wild and Free,” fishing rods and stars stickers, popping some up with Foam Squares as desired.
Explorer Border

Step 1: Using the Picket Fence Border Maker Cartridge, punch a border with Crimson Cardstock. Trim to measure 3″ x 12″ to create your base.
Step 2: Using the Double Chevron Border Maker Cartridge, punch a border with blue Camouflage patterned paper. Trim to measure 2-5/8″ x 12″ and adhere to the base as shown. Trim out the paddles and canoes section of the borders sheet of Explorer patterned paper. Mount on the border, just above the bottom edge as shown.
 Step 4: Top with “Keep Exploring” and “Explorer” stickers, popping the latter up with Foam Squares.Step 3: Punch a border with the Double Chevron Border Maker Cartridge with Crimson Cardstock and blue Camouflage patterned paper scraps. Trim out and punch pieces out with the Banner Flag Punch. Back with solid banner flags. Adhere to the border, just under and behind the canoe piece.
Explore, Beauty, Wander Border
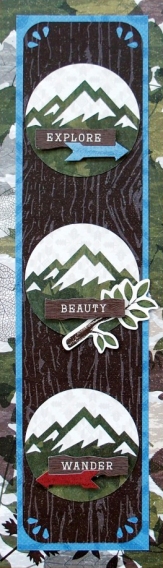
 Step 1: Cut a 3-1/2″ x 12″ strip of green leaf Camouflage patterned paper for the base. Cut a 2-3/4″ x 11-1/4″ strip of blue Explorer patterned paper and mount on top of the base. Cut a 2-1/2″ x 11″ strip of brown wood Explorer patterned paper. Punch the corners with the Essentials 4-Way Punch and adhere to the border. Step 2: Punch a border with the Majestic Mountains Border Punch with green Camouflage patterned paper. Trim to measure 2-1/4″ x 12″ and mount to a 3″ x 12″ strip of cream Explorer patterned paper. Using the inside of the medium Circle Pattern and the Red Blade, cut three circles from this piece, making sure to include a mountain peak in each one. Mount the circles on the border at regular intervals
Step 3: Top each with “Explore,” “Beauty,” “Wander,” branch and arrows stickers, popping them up with Foam Squares as desired.
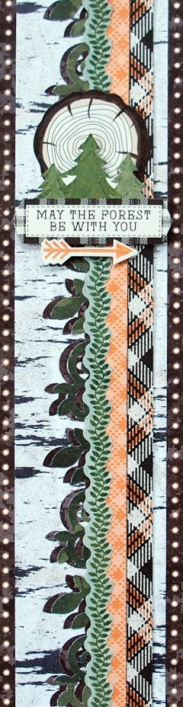
May the Forest Be With You Border
 Step 1: Using the Rainbow Border Maker Cartridge, punch a border with brown Camouflage patterned paper. Trim to 4-3/8″ x 12″ and punch the other side. Then, trim off the rainbows, leaving just the holes intact on either side. This is your base.
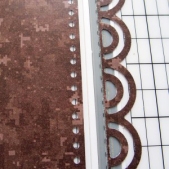 Step 2: Punch a border with the On the Vine Border Punch with brown Camouflage patterned paper and another with green Camouflage patterned paper. Slightly overlap the green over the brown and adhere down the middle of the border.Step 3: Cut a 2-1/2″ x 12″ strip of birch Camouflage patterned paper and mount on the base. Trim out the orange-and-brown plaid and orange plaid sections from the border sheet of Explorer patterned paper. Mount these on the border as shown, with the orange strip slightly overlapping the vines. Top with a vine border sticker.Step 4: Add the log slice, arrow and “May the Forest Be With You” stickers, popping the latter up with Foam Squares as desired.
These outdoor scrapbook borders are the perfect way to accentuate all your outdoor adventures and memories. Which one do you like the best?